Access control: Checkpoint
Checkpoint: General Information
Switch on Checkpoint mode at the tab Settings > General.

Checkpoint subtab is available only in Checkpoint and Parking modes.
More details on Parking mode setup:
The tab is designated to configure checkpoints and includes:
Entry and exit recognition zones set up;
Connecting executive modules;
Executive modules opening and closing algorithms set up;
Connecting Drive Through detection algorithm.
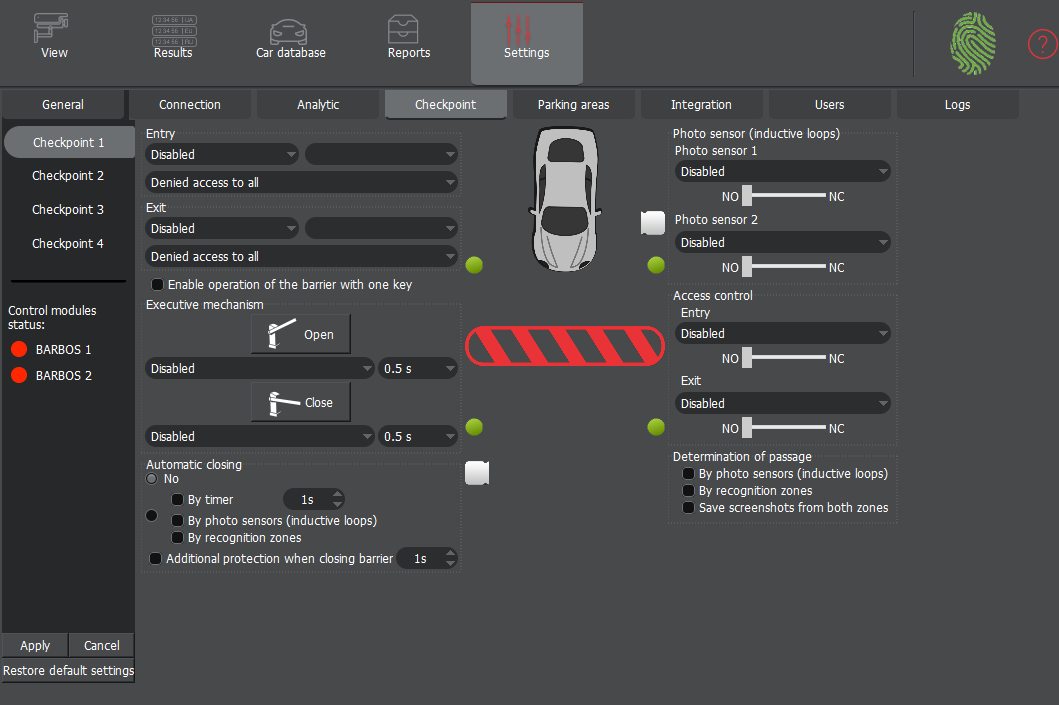
To start the Checkpoint set up please choose the checkpoint from the list on the left.
The checkpoint’s current status and configuration will be shown in the bigger section on the Checkpoint tab right.
The number of checkpoints available:
1, 2, 4 channels => 4 checkpoints
6 channels => 12 checkpoints
8+ channels => 16 checkpoints (maximum available)
In this block, you can choose entry and exit recognition zones and set up executive module opening.
In the block of entry and exit setup, you can set the recognition zone for each event, and the reaction algorithm to this event.
You can choose only the activated zones
(Settings > Connection: Recognition zones).
For bi-directional checkpoints, it is necessary to set 2 recognition zones (entry and exit) and turn on the mode for drive-through detection in the adjacent zones.
For uni-directional checkpoints a single active recognition zone is sufficient.
In the blocks of opening and closing relay setup, you need to determine the necessary relay from drop-down lists connected
to the management module and responsible for ‘open’ and ‘close’ commands, and also you need to choose the duration for the relay closure.
In case the executive mechanism works from one single relay and ‘Turn on barrier management by one relay’ is ticked, then set up
block for the closing relay becomes passive, and only the opening relay setup is available.
Entry/exit attempt reaction algorithm suggests 3 scenarios for barrier opening:
Denied access to all - no reaction for any recognized number plate;
Automatic access to all – commands will be sent to the executive relay mechanism for any recognized number plate. This setting must be chosen for NumberOk’s work in Parking mode. The AC will be managed via Parking logic.
Automatic access to authorized – commands will be sent to the executive relay mechanism only for the number plates listed in “allowed” groups of the NumberOk SMB database. This setting shouldn’t be used when in Parking mode.
Access all except denied – command will be sent to the executive relay mechanism for any number plate beside those listed in “denied” groups of the NumberOk SMB database.
You will want to set up additional devices whenever you want either of:
close the barrier per signal from the external sensor (when the barrier is not managed by the sensor directly);
have a drive-through confirmation as per the sensor signal;
Grant access from an external AC device (e.g. card reader).
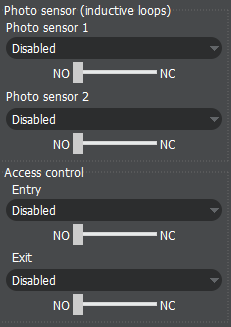
Enable sensors and AC devices as required and set up their initial state: Normally Closed (NC) or Normally Open (NO).
Photo sensors and loops are responsible for drive-through confirmation that may be followed by barrier/gate closing.
Those are green when no vehicles cross.
As long as a vehicle crosses the photosensor beam or stays on a loop, those will be highlighted red on the diagram in the middle.
When the movement detection algorithm is activated by alarm sensors (the vehicle has driven through) two sensors marks will blink simultaneously.
NumberOk can register access events (entry and/or exit) per signal from an external AC device (e.g. card reader).
The relevant record will be available under Reports > Grouped by event.
The record will be accompanied with a snapshot if there is an ANPR event on the given checkpoint that can be associated with the registered AC event.
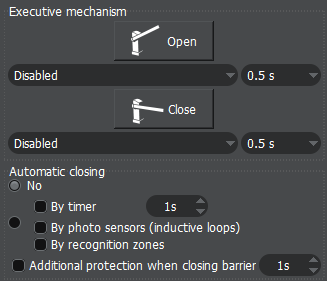
- No - NumberOk does not manage to close the gate/barrier. The gate/barrier will be closed by the checkpoint’s operator or by gate/barrier own controller (e.g. on timeout or per built-in photosensor state or direct loop connection);
- By timer - Command to close the barrier will be sent after a pre-set timeout, timer can be set for 1-30 sec;
- By photo sensors (inductive loops) – the closing command will be sent upon sensors activated in a given sequence (you may want this when photo sensors do not manage the barrier; you will want to set up a photo sensor to employ this feature);
- By recognition zones – command to close the barrier will be sent upon a drive-through event on adjacent recognition zone
- Additional protection when closing barrier - optionally set a pause for safe barrier closing. The closing process will be canceled should during the time specified at least one of the alarm sensor sends a signal (the command ‘open’ will be sent immediately to the barrier).
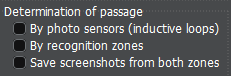
- By photo sensors (inductive loops) – entry is registered upon the physical sensors activation by the vehicle’s presence in a defined sequence. You will want to set up photo sensors to employ this feature.
- By recognition zones – entry is registered upon sequential recognition of the number plate within adjacent zones of entry and exit.
Related Articles
Access control: Parking
Access control: General information Turn on Parking mode at the tab Settings > General. Parking parameters setup Set up car park checkpoints at the Checkpoint tab. Warning! For correct work of Parking mode, you need to set up Allowed to everyone ...Local \ Client-server configuration
Local configuration In case NumberOk and the database are installed on the same PC we recommend keeping all database parameters without any changes. It is necessary to tick ’Set up the FireBird server’ Client-server configuration To set up an access ...Reactions
Reactions: General Information Reactions can be employed to manage access, have standalone visual and/or audial alerts, and/or to supplement Checkpoint and Parking modes with alerts. When supplementing Checkpoint and/or Parking modes with Reactions, ...Feature comparison table
Key features (comparison across editions) Lite SMB Enterprise Meta Reporter ANPR Sources IP cameras Y Y Y n/a n/a DVR Y Y Y n/a n/a Video file Y Y Y n/a n/a ANPR camera n/a n/a n/a Y n/a Results refinement analytics Y Y Y n/a n/a # of source channels ...Monitoring Current Events
View This mode offers live monitoring of streams from connected video sources or meta sources (LPR cameras). One place for all connected sources NumberOk supplements each detected and recognized plate with the following information: Recognised number ...