Access control: Parking
Turn on Parking mode at the tab Settings > General.

Set up car park checkpoints at the Checkpoint tab.
Warning! For correct work of Parking mode, you need to set up Allowed to everyone access mode for entry and exit in checkpoint settings.
Car park access is managed by Parking settings only.

Click Add a Car Park. A new Car park panel will be opened.
All further Car park panels will be automatically scaled and located in such a way as to fill the screen evenly.
Car park panels consist of the following blocks:
Car park name – the name that is given to a newly created Car park automatically. You cannot change it; removing other Car parks does not influence the numeration of the remaining ones;
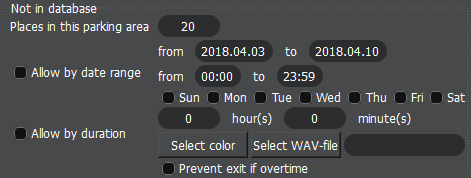
Parking lots – the maximum quantity of vehicles that can be allowed in this particular parking area simultaneously;
Not present in database – Car park access parameters for vehicles not included in Car park assigned groups;
Groups – vehicle group (assigned to this particular Car park) list from NumberOk database. Access parameters for the group members are introduced in group settings;
Checkpoint – list of checkpoints (should be created beforehand) for entry/exit to this particular Car park.
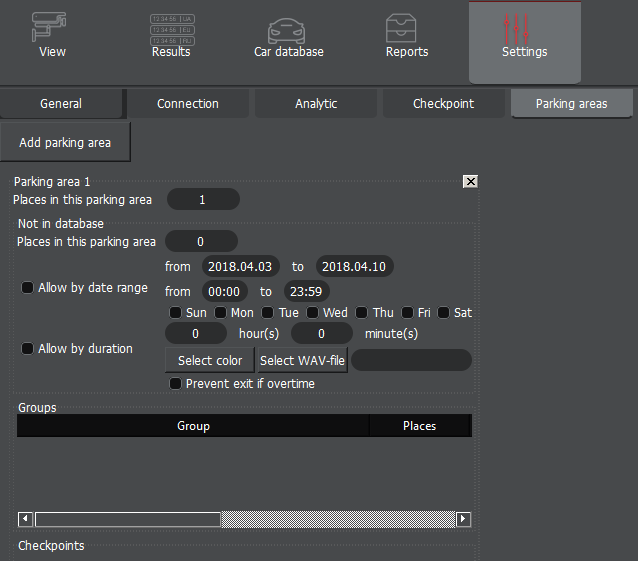
In this block you can change the following parameters:
Not present in the DB (database) \ Quantity of parking lots (places) at the Car park quantity of parking lots available for vehicles not included into any groups assigned to this particular Car park. The mentioned quantity cannot exceed the difference between the general quantity of parking lots and amount of parking lots assigned for groups at this particular Car park. In case Parking lots at the Car park parameter is equal to zero, then only vehicles from allowed groups could enter the Car park. Vehicles not included in allowed groups will not be granted access. In case all parking lots are filled with vehicles not included in groups the other vehicles (not included in groups) will be forbidden to enter - until any assigned to ‘vehicle not in group’ parking lot is freed up.
Allowed for the date range – in case this box is ticked, parameters for access by date, time of the day and day of the week are activated. Dates and times are set from the keyboard, days of the week are chosen by appropriate box-ticking. In case ‘Allowed for the date range’ is not ticked, none of the mentioned parameters apply;
Allowed by duration – in case the box is ticked, the quantity of hours and minutes for parking is assigned. From the moment of vehicle entry to the territory, time interval calculation starts. In case the vehicle does not exit the territory within the assigned duration of time it is considered a violator, and the barrier will not open automatically at the exit.
In case the box is not ticked, parking duration time is not considered.
For every non-registered vehicle number plate time interval within the territory is calculated individually;
Block of reaction buttons allows to set up reactions to exceeded allowed time interval within the Car park by a non-registered vehicle. Two reactions are available: row with vehicle-the violator in the table is marked with colour / sound alarm with the chosen sound file *.WAV;
Prohibit the exit if the time limit is exceeded ticking this box will prohibit barrier opening in front of non-registered vehicles and vehicles from assigned groups that exceeded allowed time interval within the Car park.
All points of this block (block of non-registered vehicles access control) are united by’OR’ logic.
Vehicles with such number plates will not be automatically allowed through the checkpoint, manual operator’s interference will be required.
A group setting for each Car park starts with clicking (with the right mouse button) on the block’s field and the ‘Add a group’ button.
A drop-down list of already existing system groups (of number plates) is available by clicking on the name field:
You need to choose one of the existing groups on the list. Until you do so, you cannot add one more group;
In the ‘quantity’ field insert the parking lots quantity assigned to this particular group at the Car park.
This should be a positive integer, and it should not be higher than overall amount of parking lots at the Car park;
By clicking with the right mouse button on existing group an extended menu is accessible,from here you can add one more group or cancel the one existing;
For already existing groups you can move the setting table to the right using the slider and set limited time interval within Car park
for the group members,
and also pre-set sound and / or visual reaction for exceeding the limit;
Time limitation columns activate ‘Use the limit’ tick and its setting window;
‘Use the limit’ tick will activate reactions on excess of time of stay at the Car park;
In ‘Time limit’ column you can set the allowed time within perimeter for this particular group vehicles;
Reaction columns allow to pre-set system reactions to time excess for vehicles from each group;
Colour when the limit is exceeded colours table rows with violators in the colour chosen;
Sound when the limit is exceeded allows to choose sound file *.WAV, that will replay when time limit is exceeded by any vehicle from the group;
Window when the limit is exceeded turn on pop-up window that will appear when time limit is exceeded by any vehicle from the group.
In this block you need to connect pre-registered and pre-set (in NumberOk) checkpoints to a certain Car Park.
For this you need to click right mouse button on the block’s field and choose Add checkpoint:
A new window will open; click left mouse button on this window to open a drop-down list of existing (in NumberOk) checkpoints:
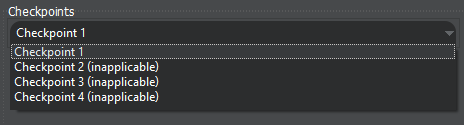
The checkpoints with incorrect setup will appear with ‘inapplicable’ note.
Click with right mouse button on checkpoints already assigned to the Car park;
a menu of ‘new checkpoint addition’ or ‘existing checkpoint cancellation’ will be shown.
Upon group and checkpoint setting Car park logic will start to operate.
Vehicle monitoring and vehicle quantity management is accessible from Results tab, Parking subtab.
Related Articles
Access control: Checkpoint
Checkpoint: General Information Switch on Checkpoint mode at the tab Settings > General. Checkpoint subtab is available only in Checkpoint and Parking modes. More details on Parking mode setup: The tab is designated to configure checkpoints and ...Reactions
Reactions: General Information Reactions can be employed to manage access, have standalone visual and/or audial alerts, and/or to supplement Checkpoint and Parking modes with alerts. When supplementing Checkpoint and/or Parking modes with Reactions, ...LPR Analytics Setup
NumberOk offers advanced recognition settings to compensate camera installation disadvantages, bad weather conditions, lack of lighting, and number plates defects. This manual describes ANPR Analytics Setup in details to allow the user to set the ...Car Database
The “Vehicle” tab In this tab, you can add cars and link them to previously created groups. Users can select a country and enter the license plate according to the template corresponding to it. NumberOk checks the correctness of the template input ...NumberOk event package specification. Delivered over TCP
In the TCP packet data pairs PARAM=VALUE are divided with ascii 0x05. Not every pair may appear in a package. Order of pairs may vary. Text is UTF-8 encoded. Pair "SystemId=N" ( N - integer value) is added to all events. Value - is primary key from ...